Difference between revisions of "Suede & nubuck shedding"
m (→Why is leather linting?) |
|||
| (5 intermediate revisions by one user not shown) | |||
| Line 5: | Line 5: | ||
==Why does leather shed lint?== | ==Why does leather shed lint?== | ||
| − | [[Suede - Nubuck - Buckskin|Suede and nubuck]] are very fibrous leathers and therefore tend to shed | + | [[Suede - Nubuck - Buckskin|Suede and nubuck]] are very fibrous leathers and therefore tend to shed lint during use. This is not a major issue with [[leather shoes|shoes]] but quite common and unsightly on [[leather handbags]] and [[leather jacket|leather jackets]]. Leather clothing with a suede lining can also accumulate lint. |
| Line 15: | Line 15: | ||
<p> </p> | <p> </p> | ||
| − | In the production of [[suede]], the leather is [[Split leather|split | + | In the production of [[suede]], the leather is [[Split leather|split into layers]] and then levelled by [[Sanding leather|sanding]]. Subsequent [[Leather production|production processes]] in the [[tannery]] do not remove all lint. Also, the [[flesh side]] of any leather is [[suede]]. Usually, leather is used in such a way that the back is hidden. Therefore, the tanner does not pay particular attention to this part. Only if the customer directly indicates this, will the tanner be able to reduce the lint. As suede has a velvet-like surface on both sides, the manufacturer is unaware which side of the suede will be used as the contact side. |
| − | [[Nubuck]] | + | [[Nubuck]] has an almost smooth surface and the fibres are shorter than suede, making them less prone to lint. |
<p align=center> | <p align=center> | ||
| − | [[bild:Fussel-Leder-04.jpg| | + | [[bild:Fussel-Leder-04.jpg|500px]] |
| − | [[bild:Fussel-Leder-03.jpg| | + | </p> |
| + | <p align=center> | ||
| + | [[bild:Fussel-Leder-03.jpg|500px]] | ||
</p> | </p> | ||
<p align=center> | <p align=center> | ||
| Line 29: | Line 31: | ||
<p align=center> | <p align=center> | ||
| − | [[bild:Fussel-Leder-02.jpg| | + | [[bild:Fussel-Leder-02.jpg|500px]] |
| − | [[bild:Fussel-Leder-01.jpg| | + | </p> |
| + | <p align=center> | ||
| + | [[bild:Fussel-Leder-01.jpg|500px]] | ||
</p> | </p> | ||
<p align=center> | <p align=center> | ||
| Line 36: | Line 40: | ||
<p> </p> | <p> </p> | ||
| − | == | + | ==How to remove lint from leather== |
| − | + | Firstly, check whether it really is lint or [[Dye transfer from leather|dye transfer]]. You can do this by sticking a piece of masking tape onto a hidden area and peeling it off. Any lint will adhere to it and can easily be recognised. If you are unsure or suspect it may be dye transfer, or other form of stain, simply take a moist cloth and rub it ten times over the leather and see if the cloth becomes discoloured or only lint is caught. If in doubt, take a close-up photo to see if lint is recognisable. Sometimes both lint and [[Dye transfer from leather|discolouration]] can occur. | |
<p align=center> | <p align=center> | ||
| − | [[bild:Leder-Farbabrieb-Lappen-02.jpg| | + | [[bild:Leder-Farbabrieb-Lappen-02.jpg|500px]] |
| − | + | ||
</p> | </p> | ||
<p align=center> | <p align=center> | ||
| − | ''In the first picture, the leather has a dye transfer problem. The second picture shows linting leather. The main problem is the | + | [[bild:Leder-Farbabrieb-Lappen-01.jpg|500px]] |
| + | </p> | ||
| + | <p align=center> | ||
| + | ''In the first picture, the leather has a dye transfer problem. The second picture shows linting leather. The main problem is the discolouration.''<br></p> | ||
<p> </p> | <p> </p> | ||
| − | + | Firstly, lint on leather should be brushed off. But bear in mind that aggressive brushing or heavy pressure can make it worse. It's also possible to use compressed air or a vacuum cleaner. None of these methods will treat the problem entirely and should be considered as preparatory work. | |
| − | + | ||
| − | + | ||
| − | + | ||
| − | + | ||
| − | + | If dealing with minor traces of lint, it is often sufficient to to spray the surface with a[[Waterproofing leather|waterproofing]] product. Apply at least 2 to 3 layers and let dry. Spray from 30 cm distance to avoid stains. | |
| − | + | This should gradually reduce but pay close attention to it over time. | |
| − | + | Use of masking tape is good for identifying the issue but may not always provide long-term satisfactory results. It may help in removing minor lint but does not stop the leather from shedding further. | |
| − | + | Applying multiple coats of a strong hair spray followed by ironing the surface has proven to reduce shedding on surfaces. Ensure you put teflon paper in between and do not have the iron too hot! Leather can [[Shrunken leather - leather shrinkage|shrink]]! It is also important to note, the surface may not look uniform if this method is used. . | |
| + | Commercial applications spray [https://www.colourlock.com/Napalan-Finish-1000-ml/224318/ Napalan Finish] using a spray gun on such surfaces and then [[Ironing leather|iron]]. In both methods, the leather fibres are glued without significantly altering the surface structure. | ||
| − | + | All methods must therefore be tested first in an inconspicuous area. | |
Latest revision as of 16:38, 17 October 2022
Why does leather shed lint?
Suede and nubuck are very fibrous leathers and therefore tend to shed lint during use. This is not a major issue with shoes but quite common and unsightly on leather handbags and leather jackets. Leather clothing with a suede lining can also accumulate lint.
Linting leather.
In the production of suede, the leather is split into layers and then levelled by sanding. Subsequent production processes in the tannery do not remove all lint. Also, the flesh side of any leather is suede. Usually, leather is used in such a way that the back is hidden. Therefore, the tanner does not pay particular attention to this part. Only if the customer directly indicates this, will the tanner be able to reduce the lint. As suede has a velvet-like surface on both sides, the manufacturer is unaware which side of the suede will be used as the contact side.
Nubuck has an almost smooth surface and the fibres are shorter than suede, making them less prone to lint.
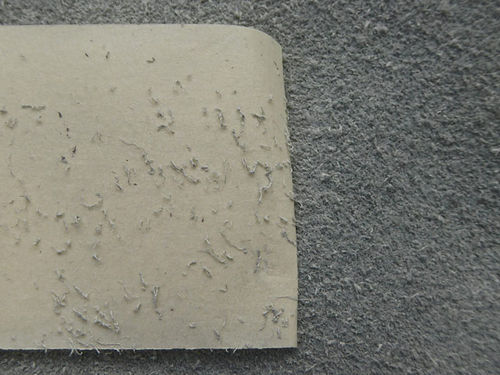
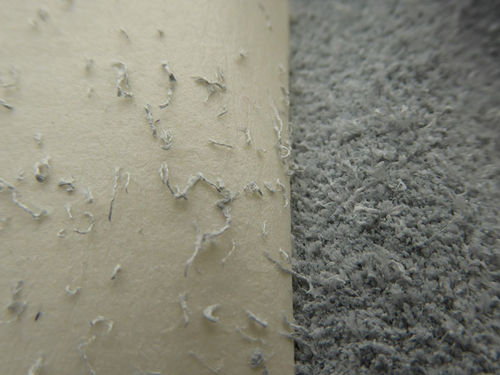
Masking tape test on nubuck: Barely any lint sticks to the masking tape.
Masking tape test on suede: Higher amount of lint accumulates on the masking tape.
How to remove lint from leather
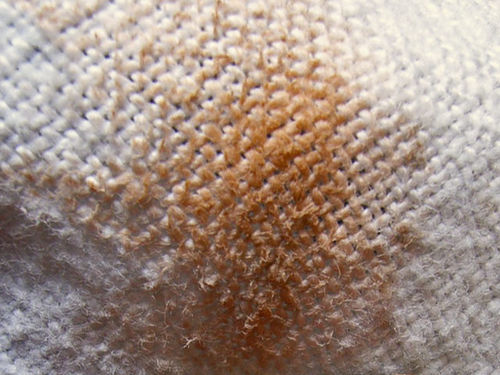
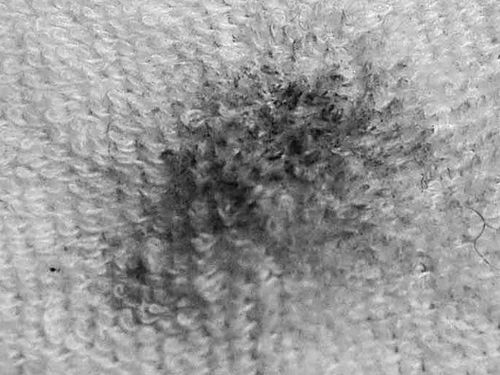
Firstly, check whether it really is lint or dye transfer. You can do this by sticking a piece of masking tape onto a hidden area and peeling it off. Any lint will adhere to it and can easily be recognised. If you are unsure or suspect it may be dye transfer, or other form of stain, simply take a moist cloth and rub it ten times over the leather and see if the cloth becomes discoloured or only lint is caught. If in doubt, take a close-up photo to see if lint is recognisable. Sometimes both lint and discolouration can occur.
In the first picture, the leather has a dye transfer problem. The second picture shows linting leather. The main problem is the discolouration.
Firstly, lint on leather should be brushed off. But bear in mind that aggressive brushing or heavy pressure can make it worse. It's also possible to use compressed air or a vacuum cleaner. None of these methods will treat the problem entirely and should be considered as preparatory work.
If dealing with minor traces of lint, it is often sufficient to to spray the surface with awaterproofing product. Apply at least 2 to 3 layers and let dry. Spray from 30 cm distance to avoid stains.
This should gradually reduce but pay close attention to it over time.
Use of masking tape is good for identifying the issue but may not always provide long-term satisfactory results. It may help in removing minor lint but does not stop the leather from shedding further.
Applying multiple coats of a strong hair spray followed by ironing the surface has proven to reduce shedding on surfaces. Ensure you put teflon paper in between and do not have the iron too hot! Leather can shrink! It is also important to note, the surface may not look uniform if this method is used. .
Commercial applications spray Napalan Finish using a spray gun on such surfaces and then iron. In both methods, the leather fibres are glued without significantly altering the surface structure.
All methods must therefore be tested first in an inconspicuous area.
Additional information




 a kotori web solution